AI IMAGE UPSCALING GUIDE
How to Upscale an Image with AI (2026) — Free, No Signup, Step by Step
Upscaling a low‑resolution photo, AI art, or logo used to mean buying Photoshop and spending hours hunting for the perfect plugin. Today the fastest answer is AI image upscaling: it adds real detail back into your picture and enlarges it without the fuzzy, pixelated blur that traditional “resize” tools leave behind. In this guide you’ll learn how to upscale an image with AI in four simple steps using image-upscaling.net — a free, no‑signup, no‑watermark online tool that supports 2×/4× enlargement up to 16K, face enhancement, and bulk processing.
What “Upscaling” Actually Means (and Why It Matters)
Image upscaling is the process of increasing the resolution of a picture — for example blowing a 1 MP photo up to 4 MP, or taking a tiny logo and turning it into a crisp wallpaper. Every pixel you add is a guess, and that is the whole problem.
Old‑fashioned upscaling (bilinear or bicubic “resize”) just smears the existing pixels and interpolates a smooth middle between them. The result? Soft detail, halos, and that unmistakable “scaled‑up” fuzziness. AI upscaling works differently: a neural network has learned what a real photograph or drawing should look like, so instead of guessing blindly it generates plausible new detail that matches the surrounding pixels. The output is sharper, cleaner, and often looks convincingly like the original was captured at high resolution.
AI Upscaling vs. Traditional Resizing
Here is the short version most people notice instantly:
| Traditional Resize | AI Upscaling (Real‑ESRGAN) |
|---|---|
| Stretches pixels, adds blur & halos | Reconstructs detail from a learned model |
| Noisy / blurry images get worse | Can reduce noise and sharpen edges |
| Fast but low quality | Deeper neural nets, a few seconds of GPU work |
| Best for: quick previews only | Best for: photos, art, logos, AI‑generated images |
Before You Upscale — Formats, Sizes & Limits
Not every image is a good candidate for upscaling, and not every file type is accepted. Here is what the image‑upscaler actually handles:
- Supported input formats: PNG, JPG/JPEG, and WebP — the formats it can decode losslessly and hand straight to the GPU.
- Not supported: animated formats like GIF and AVIF are rejected by the validator before they reach the model, because the AI pipelines expect a single static frame.
- Input size: images up to roughly 4 096 × 4 096 (≈16 MP) are accepted on the free models. The exact ceiling depends on the model and scale you pick.
- Output formats: the upscalers return PNG by default, and you can opt into WebP on the website — that usually gives a 10–20× smaller file with no visible quality loss, which also makes downloads faster.
- Price scales with output pixels: the smaller the image and the lower the scale, the cheaper it is, so a 2× upscale of a tiny thumbnail costs almost nothing.
Step-by-Step: Upscale an Image Online
Open the free AI Image Upscaler. You don’t need an account. The whole workflow is four clicks:
Which AI Upscaler Model Should You Choose?
The free site offers four model families, each built for a different job. They are all variants of the Real‑ESRGAN family of neural upscalers, plus a few extras:
| Model | Best for | Scale options | Notes |
|---|---|---|---|
| General | Large photos, very large outputs (up to 16 K) | 2× / 4× | Fast and cheap. Handles the largest inputs (≈16 MP) and can produce 16 K output. Good all‑rounder and the default fallback. |
| Plus | Art, drawings, anime, logos; transparency support | 2× / 4× | Original Real‑ESRGAN weights. Best for illustrations. Supports PNG/WebP transparency. Can look a little “plastic” on hair/faces — use Face Enhance for people. |
| Diffuser (premium) | Tiny/low‑res photos, realistic textures, photo restoration | 6 MPx / 4 MPx | Diffusion‑based (SUPIR) upscaler: it can read an optional text prompt (e.g. “grainy 1970s photograph”) to steer detail, and auto‑generates one if you leave it blank. Slowest and most expensive; requires a positive account balance. No transparency. |
| Diffuser‑lite | Budget‑friendly version of Diffuser | 4 MPx | Same model, capped at 4 MPx output. Unlike the 6 MPx Diffuser above, this one runs on the free daily quota. |
Try these models for free now →
A simple decision tree:
- It’s a photo (portrait or landscape) → start with General. For best face results, also enable Face Enhance.
- It’s an illustration / AI art / anime / logo → choose Plus. If it has transparency, Plus keeps the alpha channel intact.
- Anything and you want the highest fidelity for a tiny input → Diffuser, and add a text prompt describing the subject to guide it.
- You’re on a budget or just testing → General or Plus at 2×, which are the cheapest options and still excellent.
How to Fix Blurry / Pixelated Faces
Nothing ages a photo faster than a soft face in an otherwise sharp picture. The upscale models above reconstruct detail from texture statistics, which sometimes “smoothes over” eyes and mouths. That’s what the Face Enhance option is for: it re‑runs just the face regions through a dedicated face‑restoration network (GFPGAN) that sharpens eyes and preserves facial structure, then blends the enhanced faces back into the upscaled background.
- When to use it: portraits, group photos, or anything where recognizable faces matter.
- When to skip it: scenery, text, product shots, or art — it adds cost and runtime and isn’t needed.
- Tip: face enhancement only works with the Plus and General models (the checkbox is enabled automatically for them). For Diffuser, the text prompt often does the work already.
Tips for the Best Results
- Start with the best source you have. AI can add detail, but it can’t invent information that isn’t there at all. A noisy 2 MP photo upscales far better than a blurry 200 px thumbnail — even if both end up the same size.
- 2× often looks more natural than 4×. If you don’t need the full blowup, a smaller scale keeps the cost down and avoids over‑sharpening artefacts.
- Pick WebP for sharing. WebP output is 10–20× smaller than PNG with no visible loss, which makes downloads instantaneous and saves you disk space.
- Keep a tab open after processing. Results live in your private gallery for up to 3 hours after they finish (then the server deletes them automatically), so don’t close the tab until you’ve downloaded — there’s no “restore” once they’re gone.
- Use the daily free quota wisely. Everyone gets €0.30 of free processing per day per IP — enough for dozens of cheap upscales. That’s plenty for casual use; only top up if you hit the wall.
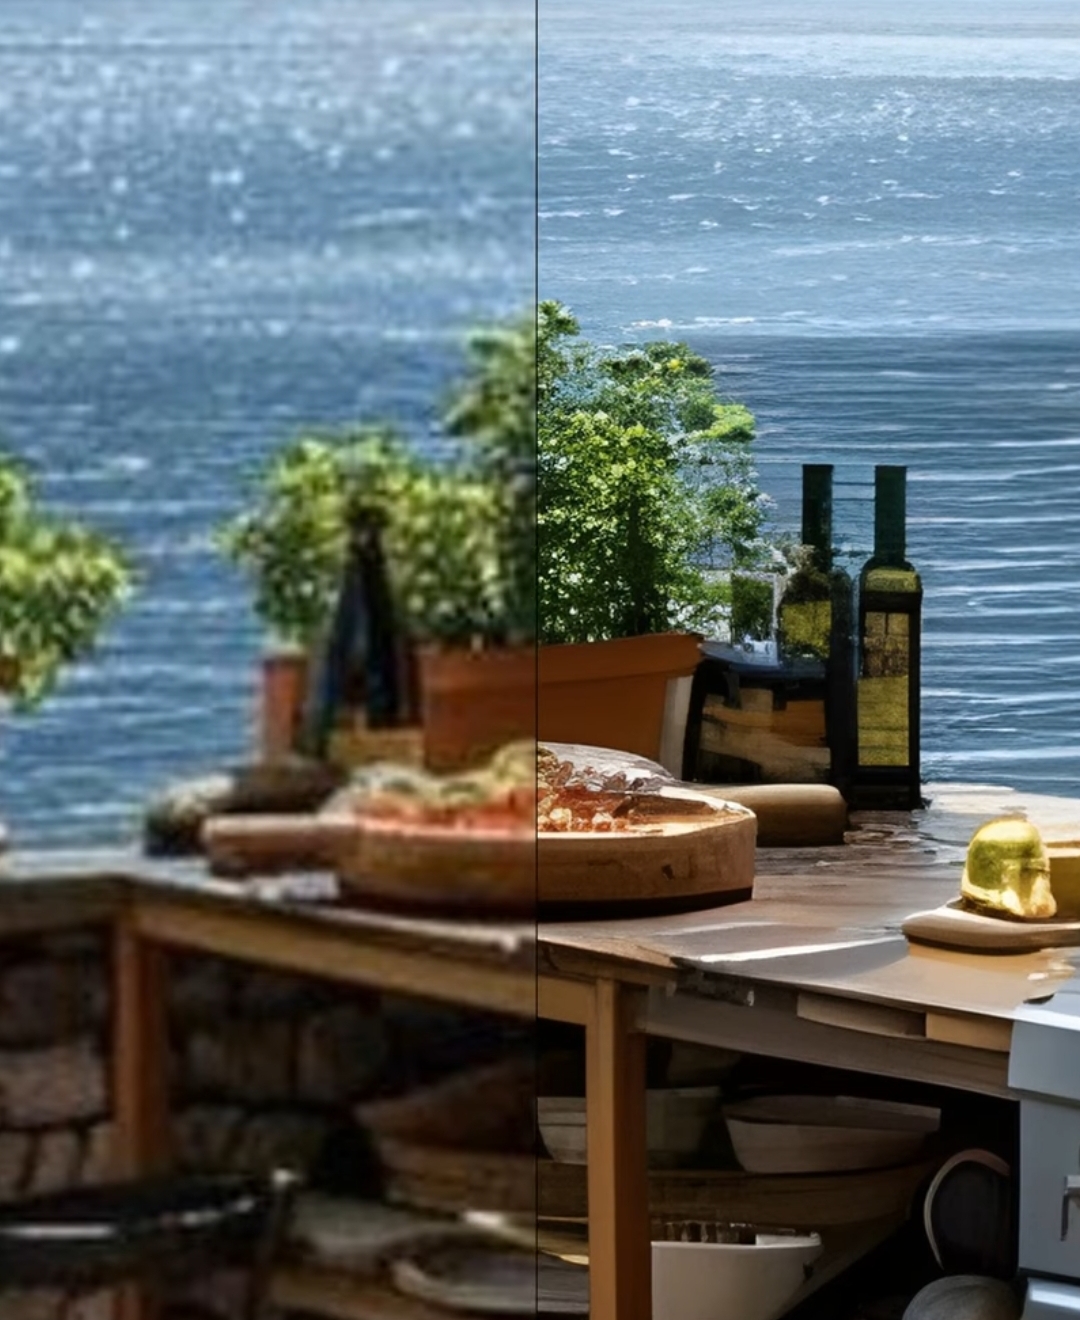
Fig. 1 — a before/after from the upscaling gallery. The AI reconstructs fine hair and texture that the low‑res original simply didn’t contain.
Upscale in Bulk or via the Free API
Need to process many images, or want to bake upscaling into a script? The site ships with two productivity boosts:
- Bulk processing. In the gallery you can select multiple results and download them all as a single ZIP, or upload several files at once — they’ll be processed in parallel by the GPU worker pool.
- Free API. Every tool, including upscaling, has a documented REST API that
uses the exact same free daily quota as the website (full API
docs). Upload with a POST to
/upscaling_upload, poll/upscaling_get_status_v2, then download with/download_upscaling_data/<name>?delete_after_download. There’s even a ready‑made Jupyter notebook you can copy‑paste.
Other Free AI Tools You’ll Love
Upscaling is only the flagship — image‑upscaling.net is a small suite of free, no‑signup AI tools that share the same quota, the same private gallery, and the same “no paywall” promise:
- Image Generator — turn a prompt into a photo‑realistic or artistic image with Qwen‑Image or Z‑Image‑Turbo (the fast, cheap default).
- re‑Imagine — redraw an existing image in 20+ artistic styles (Ghibli, Van Gogh, LEGO, Pixel art, …) using FLUX Kontext.
- Background Remover — cut subjects out of photos and get a clean transparent PNG in seconds.
- Text to Speech — synthesize natural‑sounding voices from any text (60 k character limit per request).
- Bulk Image Converter — convert many images to PNG / JPEG / WebP fully in your browser: no uploads, no watermark.
Frequently Asked Questions
Is AI image upscaling free to use?
Yes. Everyone gets a free daily quota (€0.30 per IP per day) that covers most casual upscaling. If you exceed it, you can buy a small paid balance at /account — there are no subscriptions and your balance never expires.
Do I need to sign up or create an account?
Not for the free quota. A random 32‑character client‑id cookie is created when you first visit, and your images are filed under that cookie so only you can see them. Creating an account (with an email) is optional and only needed if you want a paid balance that survives across IP changes or devices.
What is the maximum enlargement factor?
4× on the free models (e.g. a 4 000 × 4 000 input → 16 000 × 16 000 output). The “Diffuser” model instead targets a fixed resolution — 6 MPx (~2048 × 3072) or 4 MPx (~2048 × 2048) — which is ideal for small inputs. You can chain two 4× upscales if you ever need more, though a single pass is almost always better.
Will upscaling improve a noisy or very blurry photo?
It helps, but AI can only reconstruct detail that’s hinted at, not conjure it from nothing. Very noisy photos get cleaner edges and less blur; completely smooth/artifacted areas may come back a little “soft”. For faces specifically, enable Face Enhance, or try the text‑guided Diffuser model and describe the subject in the optional prompt.
How do I fix faces that look weird after upscaling?
Use the “use Face Restoration” (Face Enhance) option with the Plus or General model — it runs GFPGAN over the face regions to sharpen eyes and mouths while preserving the upscaled background. If the face still looks too different from the original, the Diffusion model’s prompt field often gives you finer control.
Are my images stored or used to train models?
No. Images are matched to your client‑id cookie, stored only on this server (hosted in Germany), and deleted automatically up to 3 hours after processing. They are never used for training, never shared, and you retain full copyright.
My request is stuck “waiting in queue”.
The service is shared, so during peak traffic there’s a short queue. You don’t need to keep the tab open — results stay available for you for up to 3 hours once processing finishes. If it’s been over 10 minutes, something may have gone wrong; let us know on Discord.
Can I upscale programmatically?
Yes — see the free API docs at /api.html. It uses the same free daily quota and returns downloadable result URLs, so a simple poll loop downloads everything for you.
Ready to Upscale?
AI image upscaling has gone from “expensive expert tool” to “free, instant browser feature” in just a few years — and you don’t need a powerful PC or a subscription to use it. Whether you’re rescuing a low‑resolution photo, giving AI art wall‑ready sharpness, or just making a logo crisper for print, the four‑step workflow above gets you from blurry to brilliant in under a minute.
No account required · Free daily quota · No watermark · Images auto‑deleted
Want the raw facts? See the About / Pricing page for exact limits and the API docs for code samples. Found a bug or have a feature idea? Pop into our Discord.